

So you want to buy meat in bulk to save money but you don’t have a vacuum sealer? Well, you and I both. Don’t despair you can still easily repackage your meat in convenient portions without sacrificing the future quality of the meat or risking freezer burn.
The problem with buying food in bulk from the supermarket is that it is typically stored in a larger quantity than you would cook in one session. This can easily lead to food waste if you fail to plan for additional meals to use the remaining meat before it spoils. The other issue you run into is typically the thin plastic used to cover meats at the grocery store is not suitable for long term freezer storage. Your food will quickly get freezer burn.
What Is Freezer Burn
Freezer burn refers to moisture loss that can occur on the meat’s surface while sitting in the freezer if it is not stored properly. This is caused by air reaching the surface of the food. Freezer burn results in a dry and visually unappealing meat that is still safe to eat but will likely be less appetizing than its fresher counterparts.
What Materials do I need to Freeze Meat
To prevent freezer burn you must package the meat properly. This means wrapping it in an airtight manner that will prevent air from easily reaching the surface of the meat. This is best done with a vacuum sealer like a Foodsaver (affiliate link), but you can still successfully freeze your meat without one.
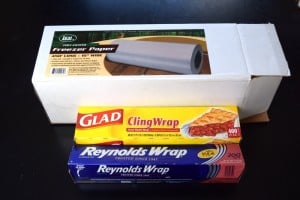
To do so you need a packaging material that air does not penetrate. For this, I recommend freezer paper. Freezer paper is a thick form of paper that is waxed on one side. This creates a barrier that prevents air from drying out the meat and causing freezer burn. Freezer paper may be found in some grocery stores or online here (affiliate link). Please note, freezer paper and butcher paper are not the same thing. Butcher paper does not have a wax coating so it will not create a suitable barrier of protection against air and oxygen transfer.
If you cannot locate freezer paper you can use Heavy Duty Aluminum Foil. Make sure it is the heavy-duty variety as it is thicker than traditional foil. However freezer paper is best as it is less likely to rip and specifically designed for freezing, but heavy-duty aluminum foil will still perform well.
I also recommend using plastic wrap as an additional layer of protection. Plastic wrap by itself is not suitable for long term storage but its ability to cling to all the nooks and crannies of the meat’s surface makes it a great supporting player to prevent against freezer burn.
What Freezer is Best for Long Term Meat Storage?
The best freezers for long term storage are manual defrost freezers. They aren’t nearly as popular since you have to defrost them yourself each year, and lets be honest people are lazy. This makes them a little harder to find in certain sizes than their frost-free counterparts.
A frost-free freezer will work fine as well, but you will get a few more months of storage from a manual defrost freezer since it has a more stable temperature. If you are using a frost-free freezer I recommend doing your best to place your meat in the center of each shelf, away from the walls, to minimize temperature fluctuations that will encourage freezer burn. These temperature fluctuations are needed in frost-free freezers to be self-defrosting.
In regards to upright vs chest freezers, the chest freezer will be more efficient to operate since the cold air will not fall out every time you open the door. Instead since cold air sinks, it stays in place at the bottom of the freezer even while you are standing there with the lid open. However, upright freezers will be far more convenient since its shelving will present all of your food options in easy to access locations. In a chest freezer, you will be going on a treasure hunt, having to dig through everything in a chest freezer, to find something on the bottom.
How to Freeze Meat
Now that we have our materials let’s take a look at how to freeze meat for long term storage.
Step 1: Divide your meat into meal-sized portions. This will be different for everyone; obviously a family of 4 will use more chicken breasts per meal than a bachelor. So use your judgment to decide what portion size is right for you.
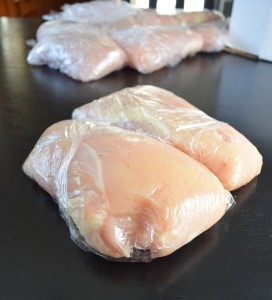
Step 2: Roll out a length of plastic wrap suitable to wrap around your portion of meat multiple times and set the raw meat on it. Tip: It helps to have tongs on hand to transfer the raw meat onto the wrap. This will keep your hands clean and the area free of possible cross-contamination.
Step 3: Wrap the plastic around your meat multiple times to ensure it is fairly airtight. As you wrap the meat be sure to focus on ensuring the plastic wrap is snug and is making contact with as much of the surface as possible. This will help prevent freezer burn.
Repeat step 2 & 3 with the remainder of the meat.
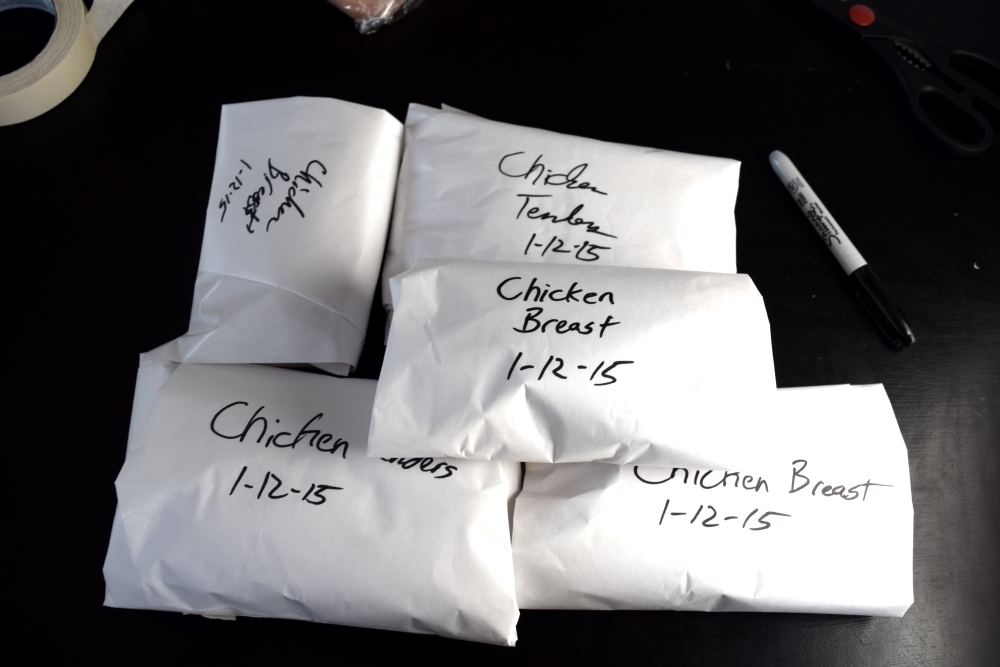
Step 4: Roll out a length of freezer paper long enough to wrap around the portion of meat 2x.
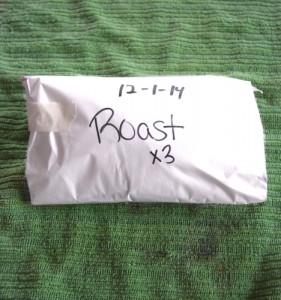
Step 5: Wrap the freezer paper securely around the portion of meat and tape shut. Freezer tape is good for this, but any heavy duty tape will work. I have used masking tape but it requires a lot to get it to stay taped.
Continue to repeat steps 4 & 5 until all meat has been wrapped.
Step 6: Label and date the meat. Obviously it is important to know what is in the packaging but it is also important to know when you put it in the freezer so you can use the meat before the quality deteriorates.
This meat should stay fresh for 6 months or longer depending on your freezer and how well you wrapped it.
How to Thaw Meat
It is not recommended to thaw meat at room temperature. This risks the meat sitting in unsafe temperatures for extended periods of time, inviting food poisoning. Instead, thaw meat in your refrigerator, or you can also quickly thaw meat in a cold water bath.
Do you have additional tips for freezing meat? Share them below! And be sure to like Fox Valley Foodie on Facebook or follow me on Pinterest to stay on top of all my latest posts!
Abigail Murdock
AMAZING! Great tips! Now, I have more way to protect food so long without vacuum sealer. So cheap and easy! Thank you!
Rebecca Miles
I have one vacuum sealer at home and use it all the time. Now it's broken, so sad! Thanks for your idea. I'm gonna try it your way while I fix my vacuum sealer!
Larry Belanger
Have always used my vacuum sealer for keeping the leftover from my kitchen garden fresh and useful for even a whole week, this idea of keeping the dough of cake or cookie is great, thanks a ton!