If you’ve never made a deep-fried turkey, you should. I first made one about three years ago. Simply put, it is amazing. My wife’s grandmother said it was the best turkey she ever had. Below, I’ll share the “how-to” on deep-frying a turkey, and also offer a few tips based upon my own experiences.
Here’s what you’ll need to fry a turkey:
• A turkey! – about a 8-12 lb. bird. Don’t go much larger, as it might not fit in your fryer. Remove the giblets, of course. FULLY thawed.
• Seasonings – you can use whatever you want to season your bird, though some blend of Cajun/creole seasoning seems to be the preferred rub.
• 3-5 gallons of frying oil. Virtually every recipe online calls for peanut oil.* If you can afford it, great. If not (I can’t), then go with regular vegetable/canola oil. Do not use cottonseed oil. I learned the hard way that it doesn’t work well, and leaves a bad taste.
• Peanut oil. I know, I know. I just told you that you could use a different kind of frying oil. And you can – but it doesn’t hurt to have a small bottle of peanut oil anyway, which you’ll see later.
• An injector? Some people use these –as something of a brine, but I have found it to be unnecessary. You can learn more online if you want.
• A turkey fryer, with stand and propane tank. You can use the basket to hold the bird, but my fryer came with a stand that you insert through the turkey. This is preferred.
• A thermometer with a clip, to measure your oil temperature.
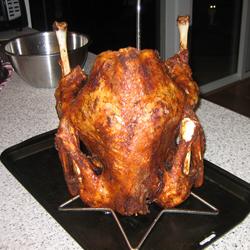
Stolen from the internet (http://allrecipes.com/Recipe/Deep-Fried-Turkey-Marinade/Detail.aspx?prop24=RD_RelatedRecipes). Intended for educational use, to show the stand inserted through the turkey. Not visible is the hook on top, used for insertion and retrieval from the oil.
1. Set up your cooker. Familiarize yourself with its operation. Safety is key when using an outdoor deep-fryer. The last thing you want to do is tip over and spill gallons of boiling hot grease on yourself or others.** Also, don’t use the fryer indoors. If your oil starts on fire, you’ll burn down your garage.
2. Determine how much oil to use. Put the turkey into the empty fryer, and fill the fryer up with water until it covers the bird. Then remove the turkey. Mark (with a piece of masking tape) the water line. Dump out the water.
3. Get your oil going. Fill the fryer with oil up to the taped mark (never more than ¾ full), and remove the tape. Turn your flame on and start heating the oil to 375 degrees.
4. Prep your turkey. Wipe your turkey completely dry. Now, you’ll want to put your rubon and let it sit while your oil heats. Make sure to liberally rub the inside and outside of your bird. You may wish to, at this point, also rub your turkey with some peanut oil.* It’s a trick to impart a bit of the flavor without needing to purchase 5 gallons of the stuff. Let your turkey sit and absorb some flavor.
5. Insert your turkey into the fryer. Once the oil has reached 375 degrees or so (turn it down if it starts to smoke, obviously – where there’s smoke there may soon be fire), slowly lower your turkey into the oil. And when I say slowly, I mean sloooowwwly. It may take you a minute or two. But the oil will be splashing, and going too fast is hazardous to your health and safety. Wear a leather glove and long sleeves to protect yourself from heat, steam, and oil.
6. Drink a beer and wait!
7. Watch the temperature. Your oil will drop in temp when you insert the turkey. Get the oil back up to, and continue to maintain, 350 degrees. Your bird will take about 3½ minutes per pound to cook. When the internal temperature of the turkey (in a thick part of the meat – thigh or breast) is 180 degrees, remove the turkey and cover it in foil. Let it rest for 15-30 minutes.
8. Turn your fryer off. Keep kids and animals away from it, as it will maintain its temperature for a while.
9. Enjoy your meal!
When it’s safe, strain and capture your oil for reuse. Each oil is different in terms of reusing and storage period.
*Check with your guests regarding peanut allergies!
**Another note about using a fryer. Recently, I was gator fishing down in Louisiana. In New Orleans, I
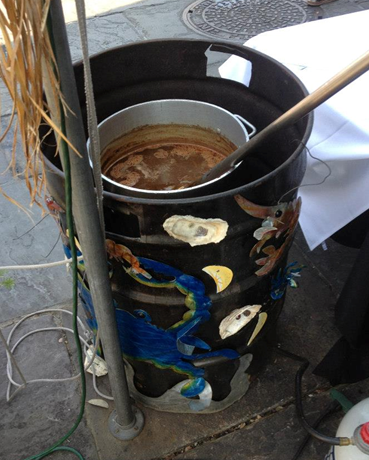
If you’ve got the storage space, consider making one of your own. You’ll have to cut a hole in the barrel to allow for the propane hose to pass through. As a bonus, you can decorate it like this guy did!
Last thing – I promise. Use the bones and left-over meat to make a soup! It will also be delicious.
-Submitted by Fox Valley Native


Leave a Reply